
Login
(Click To Change)
Chevrolet Corvette C8 Brake System Guide
This guide covers much of what you need to know to replace the brake pads and brake rotors on your C8
Z51 Corvette.
We also performed a brake fluid flush and bleed with racing brake fluid.
MAKE
SURE YOU KNOW HOW TO LIFT THE VEHICLE!
Before starting please be aware of how to safely lift the vehicle. The C8 has both holes AND slots on the underside and you CANNOT use the holes as lift points. Please refer to the images below to correctly identify the lift points. Failure to do this correctly is both dangerous and expensive.
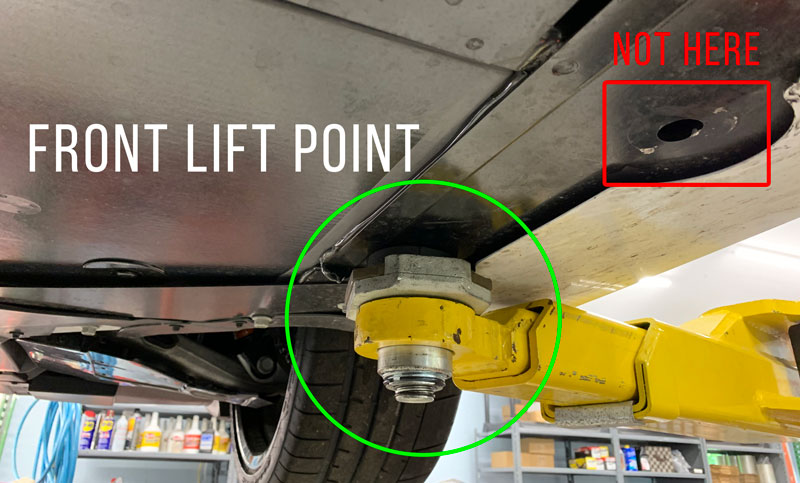
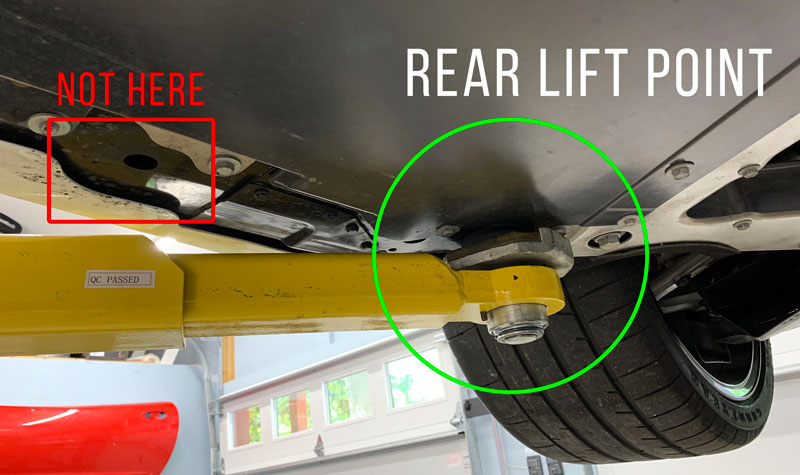
We cannot advise strongly enough to use caution in lifting the vehicle.
Brake Pad Replacement Guide
The video below covers the process we used to replace the brake pads on a C8 Z51 Corvette. Note this was
the first time we saw the new model AND the first time the pads were removed. We did not have the
semi-rare socket for the cross bolt that GM used on the front brake calipers (part number LASER-6383)
AND the factory pads are held to the piston by a strong adhesive. This can make first time removal
difficult if the calipers are on the car and the pads are near full thickness.
We do now have
those sockets in stock. In the video we removed the front caliper to more easily get the pads out and
for a first pad swap that is still suggested.
**UPDATE: Pad swaps are much easier with the adhesive gone and the correct socket.
Raise the car and SAFELY support the vehicle. Tools required:
-
22mm socket - lug nuts
-
Laser-6383 socket - front caliper 9mm spline bolt
-
21mm socket and long handle wrench - front caliper bolts
-
T40 Torx - front caliper pins
-
Small punch - rear caliper pins
-
Channel locks and/or a "flat plate" to lever the pistons back
-
Hammer
22mm socket - lug nuts
Laser-6383 socket - front caliper 9mm spline bolt
21mm socket and long handle wrench - front caliper bolts
T40 Torx - front caliper pins
Small punch - rear caliper pins
Channel locks and/or a "flat plate" to lever the pistons back
Hammer
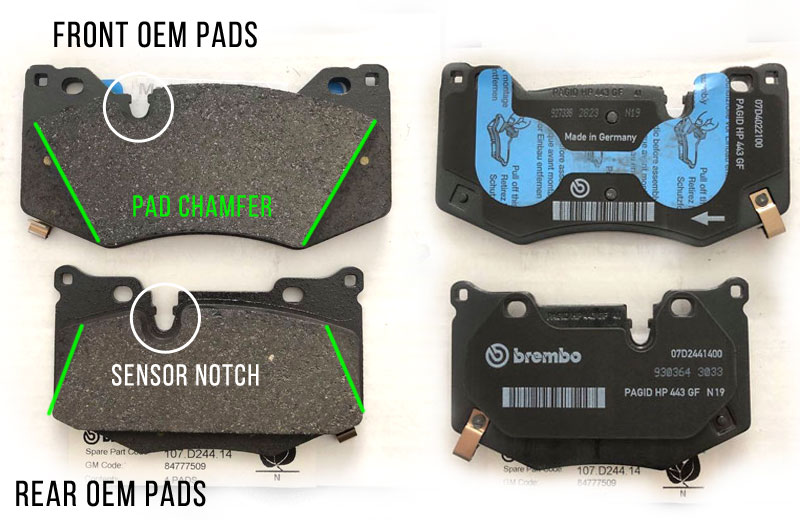
Note the race pads where we have filled the chamfer's and sensor notch with added pad material. We also have low dust pads available to those who prefer that.
Brake Rotor Replacement Guide
The video below covers the process of replacing the brake rotors on your C8 Corvette. You will need a strong impact gun or long handled wrenches to break the caliper bolts loose.
Raise the car and SAFELY support the vehicle. Tools you will need:
-
22mm socket - lug nuts
-
21mm socket / long handled wrench - front caliper bolts
-
T40 Torx - front caliper pins
-
T30 Torx - rotor hold down bolts
-
18mm socket / long handled wrench - rear caliper bolts
-
15mm socket - e-brake caliper bolts
-
Small punch - rear caliper pins
-
Channel locks and/or a "flat plate" to lever the pistons back
-
Hammer
-
Small bungee cords to support the brake calipers, or a platform to set them on
(do not hang calipers by the brake line)
22mm socket - lug nuts
21mm socket / long handled wrench - front caliper bolts
T40 Torx - front caliper pins
T30 Torx - rotor hold down bolts
18mm socket / long handled wrench - rear caliper bolts
15mm socket - e-brake caliper bolts
Small punch - rear caliper pins
Channel locks and/or a "flat plate" to lever the pistons back
Hammer
Small bungee cords to support the brake calipers, or a platform to set them on
(do not hang calipers by the brake line)
We installed two-piece Girodisc brake rotors on the Kaizen Motorsports C8 Z51 Corvette. In addition to increased durability, these rotors offer significant unsprung weight savings.
Brake Bleeding
You will need approximately 3 half liter bottles of brake fluid to flush the whole system. Disconnect the battery first and keep the hood open. The magnetic bottles are very useful in collecting old fluid.
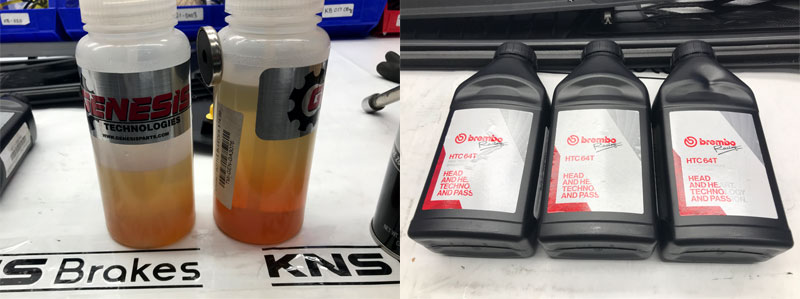
The front calipers have two bleeder valves each. Fit a small hose over the valves, place the other end of the tube inside a container/bleeder bottle. Use a box end wrench to loosen the bleeder screws until you see the fluid flowing. In our case the racing fluid was darker and more dense than the factory fill so it was easy to see when we were done as the new fluid settled in the bleed bottles. We used gravity and the brake pedal to flush and finished with the 'two-person' method to make sure there was no air in the system.
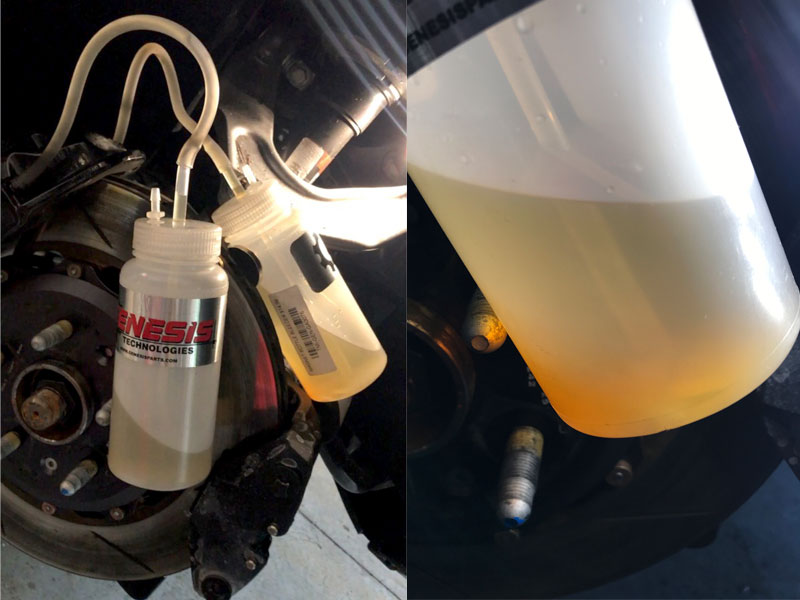
Keep adding the fresh fluid to the brake reservoir as you bleed. Note the 'chamber' on the top of the master cylinder reservoir will limit how fast you can top it off.